Upgrade your Nexus 5 to Lollipop 5.0

Ok, check it, you want to upgrade your Nexus 5 to Lollipop 5.0 (apparently this work with the Nexus 7 and 9 as well).

First, you will need Nexus Root Toolkit tool for your desktop – I’m running windows 8.1 for my sins but it may work elsewhere – other OSs are available. You can download the tool for windows here: http://www.wugfresh.com/nrt/

Once you’ve got the Nexus Root Toolkit install it! What am I? Your dad?

Ok, once you have the root kit installed. You need to put your phone into ‘developer mode’. Settings -> about phone -> tab ‘Build number’ a bunch of times and it will pop up and say you’re a developer. Now when you go to settings you’ll see Developer options. Go in here and enable USB Debugging. Ok you’re all set.

Open the Root toolkit on your desktop and plug your device in.
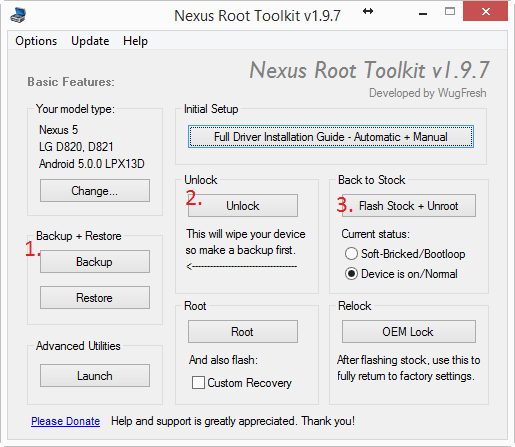
Untitled

Follow the order.

1. You need to backup. Failure to do so may result in the loss of cat pictures!

2. Then unlock

3. The flash the device. You will have to download the Lollipop software here.

And that’s pretty much it. If you need more help check out this guys video tutorial: here

Reverse Proxy for SabNZDB and NZBDrone with Apache

Hi Guys,

I haven’t blogged for a while. It’s been a bit hectic at this end. I’m no longer working as a sysadmin. I’m now working as a project manager for UC and SCCM solutions.

Anyway, just moved house and am in the process of configuring SabNZDB and NZBDrone. Rather that having to remember the ports for all of these different services e.g. http://domainname.com:8989 I’d like to just remember a short name for each service e.g http://domainname.com/sab or http://domainname.com/drone

Right, lets get started:

1. Setup SAB and Drone as you usually would but rather than opening up ports 8080 and 8989 (Default SAB and Drone ports ) only open up port 80 to the server.

2. Download and install XAMPP. I’m running this on a little Windows 7 box. Here is the link: https://www.apachefriends.org/download_success.html

3. Once its installed and is up and running stop the Apache service from the application tool.

4. Once you’ve done this go to the config location for Apache (Default is: C:\xampp\apache\conf) now find the  httpd.conf file and open it with notepad.

5. Ive added these two sections at the bottom of the file:

<Location /sab>
order deny,allow
deny from all
allow from all
ProxyPass http://localhost:8080/sabnzbd
ProxyPassReverse http://localhost:8080/sabnzbd
</Location>

<Location /drone>
order deny,allow
deny from all
allow from all
ProxyPass http://localhost:8989/drone
ProxyPassReverse http://localhost:8989/drone
</Location>

6. Once you’ve done this and save the files you should be able to get to Sab and Drone from outside your firewall.

E.g http://mydomain.com/sab and http://mydomain.com/drone.

One additional note with NZBDrone

You may see just NZBDrone Ver. If you do, do this:

In NZBDrone:

  1. Go to Settings -> General
  2. Set URL Base to desired path
  3. Save settings
  4. Restart (Restart as administrator on Windows)
  5. Donate ❤

Let me know if you need further details

Cheers!

Export users mailbox from exchange 2010

Exporting Mailboxes with Exchange Server 2010 SP1


Exchange Server 2010 Service Pack 1 introduced a new method for exporting mailboxes called Mailbox Export Requests. This new method replaces the previous Export-Mailbox command.
Before we look at how to create a new mailbox export request in Exchange 2010 SP1 there are a few things that you should understand.
Firstly, no accounts are granted the rights to export mailboxes by default. You need to explicitly grant these rights, even to accounts that are organization administrators.
Secondly, the mailbox export request is processed by the Client Access server role. Because multiple Client Access servers can exist in a site the request could be processed by any one of them. To ensure that the path to the export PST file is valid for any Client Access server it has to be a UNC path to network share, not a local path.
Granting User Rights for Mailbox Exports in Exchange 2010 SP1
The first step is to grant the right to export mailboxes to an account in your organization. In the Exchange Management Shell run the following command.
New-ManagementRoleAssignment –Role “Mailbox Import Export” –User Administrator
If you’re logged with that user already simply restart your Exchange Management Shell session to be granted access to the new cmdlets.
Creating a Network Share for Mailbox Exports in Exchange 2010 SP1
Next we need to create the network share that will be used as the file path for the exported PST files. All that is required here is a network share that the Exchange Trusted Subsystem group has read/write permission to.
Exporting a Mailbox with an Exchange Server SP1 Mailbox Export Request
With everything configured properly we can now use New-MailboxExportRequest to start the mailbox export. The only two required parameters for the command are the file path to the export PST file, and the name of the mailbox to export.
[PS] C:\>New-MailboxExportRequest -Mailbox “adrian.chatto1” -FilePath \\dserver\pst\davelister.pst
To view the status of the request uses the Get-MailboxExportRequest cmdlet.
[PS] C:\>Get-MailboxExportRequest
Name Mailbox Status
—- ——- ——
MailboxExport KPS/Company/Users/Head of… InProgress
You can also see more detail about the mailbox export request with Get-MailboxExportRequest.
An easy way to see the progress of all mailbox export requests is to pipe Get-MailboxExportRequest into the Get-MailboxExportRequestStatistics cmdlet.
[PS] C:\>Get-MailboxExportRequest | Get-MailboxExportRequestStatistics
Name Status SourceAlias PercentComplete
—- —— ———– —————
MailboxExport InProgress Adrian.chatto1 20
Exporting an Archive Mailbox with Exchange Server SP1 Mailbox Export Request
You can also export a user’s Personal Archive using mailbox export requests simply by adding the -IsArchive parameter to the command.
[PS] C:\>New-MailboxExportRequest -Mailbox davelister -FilePath \\dubbur-fs01\pst\davelister.pst -IsArchive

MS SQL Reporting Services running slow

For a few weeks, my Business Intelligence Architect has been complaining that the SQL Reporting server has been running slowly.

At first, we thought that the services seem to “go to sleep” and need awakening once a day. However, it seems to run slow more than once a day. After reading this article:

http://www.mssqltips.com/sqlservertip/2197/how-to-speed-up-ms-sql-server-reporting-services-ssrs-on-first-run/

it seems that the idle processes “goes to sleep” after 20 minutes. After the service has gone to sleep, the time consuming handshake has to take place again next time the report it run. This can take up to 60 seconds and gives the impression to the user that the system is slow.

It is possible to increase this “idle time out” limit. We have increased it to 120 minutes (someone should run the report at least once every 2 hours, keeping the service alive). We didn’t want to increase it further than this as we are not sure what effect this may have on the server.

Here is how we made the change on IIS 6:


iis6

How to crack the Windows Terminal Server 120 day trial

http://www.ehow.com/how_7543547_reset-120day-terminal-server-timeout.html

Instructions

    • 1

      Restart the Windows Server 2008 computer, and log in to a Windows Server 2008 computer Administrator account. Click “Start,” and select the “Search” box. Enter “%WINDIR%\system32\lserver” in the “Search” box, and press “Enter.” The “Lserver” window will appear.

    • 2

      Right-click on the “TSLIC.edb” file, and click “Rename” in the menu that appears. Enter “tslic.prior” in the name box, press “Enter” and then reboot the computer.

Read more: How to Reset a 120-Day Terminal Server Timeout | eHow.com http://www.ehow.com/how_7543547_reset-120day-terminal-server-timeout.html#ixzz2Ihve2dXT

Installing and configuring Sage ERP

·         Navigate to <Software path of Sage>\WSSetup

·         Run the Setup.exe

·         Set the Programs path to: c:\Sage

·         Set the Data path as: c:\Sage

·         Run ‘sqlncli.msi’ From SQL 2008 R2 install folder

·         Go to Control Panel\User Accounts\User Accounts

·         Set the UAC settings to never notify

·         Go to:

C:\ProgramData\Microsoft\Windows\Start Menu\Programs\Administrative Tools

·         Run ‘Data Sources (ODBC)’

·         Go to System DSN tab

·         Click Add

·         Select SQL Server Native Client and click next

·         Set the name as ACCPAC and the server as <SQLSERVERNAME\INSTANCENAME – (you can leave the description blank)

·         Click next

·         The username should be set as ‘sagerpadmin’ (Or whatever you set it to in the DB)

·         Click Next then Finish

·         Copy the lic and Site folders from here: \\dubbur-fp02\Public Data\UAE\IT\SageFiles to c:\Sage

Open Database setup & configure database setup based on above

When printing (For example; a PO) for the first time, it will aim at the local C:\ drive so when printing:

·         Navigate to \dubbur-sage01\accpac\Program Files (x86)\Sage\Sage Accpac\PO60A\ENG and select your .rpt file name. (purchase order-other than KPM)

Increase disk partition size when windows disk manager has extend disk grayed out

Firstly, extend volume with Diskpart.exe

To extend volume with diskpart.exe, you just need to open up Command line utility with Administrators rights (Start -> right click CMD and choose run as administrator). Type Diskpart and the utility fires up.

  1. Open a command prompt and type diskpart.
  2. At the DISKPART prompt, type list volume. Make note of the basic volume you want to extend.
  3. At the DISKPART prompt, type select volume <volumenumber>. This selects the basic volume volumenumber that you want to extend into contiguous, empty space on the same disk.
  4. At the DISKPART prompt, type extend [size=<size>]. This extends the selected volume by size megabytes (MB).

Moreover, you can use this commands like: Delete partition, Format and more – you can read further on over here.